Figure 1
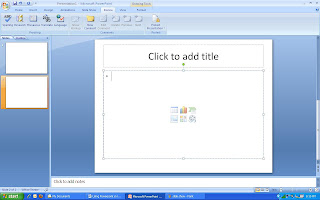
If you look at the screen print in Figure 1, you will see there are three main parts to the page. The section running across the top of the page is the toolbar section, but we will look closer at that in a little while. The section running down the left hand side is called the slide selector. This is where you will see a small icon of all the slides you have produced. We only have one slide showing at the moment because we have not begun to produce the presentation yet. When we have several slides there, clicking on one of the icons will bring it up in the main section.
The main section of the screen is showing the current slide. When you open up Powerpoint it will start with this type of slide as a default. You can see that it has two boxes set on it. These are the title and subtitle boxes. As the boxes state, click in the top box to type the title and then click in the lower box to type the subtitle.
Figure 2
In Figure 2 above, you can see the left hand side of the toolbar section. The main buttons on here are the Home, Insert, Design, Animations, Slide Show, Review and View tabs. The Home tab is the general work tab. This is where you will find all the text set up buttons such as you would in a Word document. There is also the New Slide button. This is in two parts. Pressing the upper part will insert a new default slide directly into the slide selector and it will also appear in the main section. This default slide is for any slide after the title page and includes a title box and a larger box to insert your main information.
Pressing the lower part of the New Slide button will produce a drop down box showing a selection of different slide layouts. You can click on any of these to insert it into the slide selector.
There are many more buttons residing in the Home tab, but there is not enough time to list them here, my advice with all Office applications is to play with them and you will soon see how things work.
Figure 3
In Figure 3, you can see six icons in the center of the large text box. These are insert shortcuts. Clicking on any of these icons will help you insert the particular type of media you have chosen. If you just want to add text, then just click in the box as normal and start typing.
You will also notice that the second small slide in the slide selector section is highlighted. This shows you at a glance which slide you are working on. If you click on any of the other slides here, it will take you to that slide. In this case we only have one other and that is the title slide.
Figure 4
In Figure 4 the Insert tab has been selected and you can see the many types of objects and media you can insert into the slides. You can insert everything from simple text to photo albums, soundtracks and movies. Once again playing with the application will teach you much more than reading a blog.
Figure 5
Figure 5 shows the Design toolbar. This is where you can start to add a little color and interest. If you have already made a few slides, then hovering your cursor over the design panes at the top will change your slides and allow you to see what each design would look like. When you have chosen one you like, just click it and it will insert the design to all your slides. One word of warning. Some of the designs have different placement of the titles and text boxes. You may have to go through the slides and adjust the text and object to work with the new design.
Figure 6
In Figure 6 we see the Animation tab. This is where you can let your imagination start to run, but try and keep control as too much special effects can distract your audience’s attention away from your presentation subject and on to all the gadgets and gizmos you have going on behind you.
The main part of the toolbar is similar to the design tab where you had several option panes that you could choose from. In this case it is slide transitions. Putting your cursor over each pane will show you how the slide change will act.
Figure 7
Figure 7 shows the slide show tab open. If you have any animation inserted in your presentation, then this is where you can check to make sure it works. You have the option to run the presentation from the beginning or from any slide that you select. It will show it in full screen mode, just as it would appear at your presentation. It is a good idea to check and recheck your slides as you build your presentation. It can be very tedious to correct all your mistakes all at once.
Figure 8
Figure 8 shows the review toolbar. This is another tab to use frequently as it is where you check things like spelling, research sources and editing the notes, which we will talk about later.
Figure 9
Figure 9 shows the View tab. This is a useful tab when you want to re-organize your presentation. You can see in this one I have chosen the slide sorter tab. This will allow you to see your slides all on one screen, where you can drag and drop to rearrange them in a different order.
You also have the different master tabs. These allow you to separately organize slides, notes and handouts. When these tabs are used, they will replace the normal toolbar section with their own master toolbar. To return to the normal toolbar, just click the close master button on the right hand side.
We have mentioned Notes a couple of times so now is the time to explain what they are used for. Basically, they are your script. If you look below the main slide section on the earlier diagrams, you will see a small section with the words ‘Click to add notes’. This is where you will type your notes to guide your presentation. Each slide will have its own notes attached to it. This helps to prevent you from either missing to mention something pertinent to the particular slide or actually saying too much.
When you have finalized your presentation, you can print out your ‘script’ with prints of your slide and the notes underneath them as shown in Figure 10 below.
Figure 10
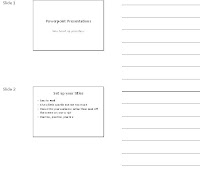
You may want your audience to take something away with them, to remind them of all the information you have presented. You can do this in the form of handouts. These are printouts of the slides, with a space beside each one for the viewer to take their own notes as you progress through the presentation. Figure 11 shows a typical handout where the audience can take their own notes and Figure 12 includes the notes you yourself included.
The way to prepare these handouts is very simple. Click on the Office button in the top left corner of the screen and it will show the drop down list of options. Select Publish and then select ‘Create handouts in Microsoft Word’. This will then open an options box where you can select the type of handout you want and Word will open and produce the handout automatically.
Figure 11
Figure 12
The many options you have to personalize your presentation are too numerous to mention here. But I hope I have given you the basic tools to start your first presentation. The main things to remember are:
1. Keep your slides smart but simple
2. Do not use too many special effects
3. Try to refrain from having too much for the audience to read on each slide.
4. Practice the presentation until it is second nature.
5. Play with the application. Experiment with different tabs. That way you will learn more of what you can do with Powerpoint.


No comments:
Post a Comment