One of the regular jobs I have to do is clean people's computers. This is usually because the computer is running slow or in the worst situation, has a virus of some type infecting the running of the programs. All the computers I look after get a clean up on a regular schedule, but even then an attack can still get past the anti-virus program and firewall. I thought it might be a good idea to take you through the procedure that I use so you can do it yourself on your own computer.
Firstly, there is no reason for you to buy anti-virus programs or cleaners. There are several free download programs on the internet that are just as good as the expensive programs that are usually given as trial versions on new computers. These trial systems are fine but they kind of bully people into taking out a subscription with them because people don’t realize they can scrap the trial applications and get the free ones. I will give you the names of the free downloads as I go through the routine.
Someone recently asked me what the difference is between adware, malware, spyware, scare ware and viruses. I answered in that they are all intruders that you did not ask to be installed on your computer. They just have different actions and severity. I actually think the scare ware infections give the user the most concern. They are the infections that pop up telling you that your computer is being attacked by viruses and that to get rid of them you must press the button. DON’T PRESS THE BUTTON. Instead, try to close the windows using the exit X in the right hand top corner. If this does not work, shut the computer down until you can get it cleaned. Once again I stress DO NOT PRESS THE BUTTON.
Adware are adverts that are usually downloaded with free downloads. It is usually sponsorship that the developers of the program use to recover some of the development costs of the program. Spyware is information stealing software similarly downloaded with other programs that sends browsing information and possibly personal and financial information back to a website. Malware is any software that is there to either disrupt the operation of the system or steal information, so therefore spyware is a form of malware.
Viruses are a little more complicated in that the main reason for a virus is to do as much damage as possible. These are usually built by sick-minded individuals who live in an underground sub culture that includes hackers. They spend all their spare time building programs that will break through firewalls and encryption programs. They really do need to find a hobby and get out more.
Okay, to the clean up.
The first thing to do is a disc clean up. If you are using Windows then you already have this in your programs. I will list the clicks so you know where to find it.
Start
All programs
Accessories
System tools
Disk Cleanup
This will bring up a small window that will state it is calculating the space available. Another window will appear with a list of file groups that it has determined are surplus to requirements. Next to each one is a check box from which you can select or ignore that particular file group. Usually the file groups can be cleaned out without any detriment to the running of the computer. So go ahead and check all the boxes that have file sizes lager than zero. Then click the OK button. It will then pop up with a question ‘Are you sure you want to perform these actions?’ Click Yes and it will then bring up a small window similar to the first one with a filler bar. The program will automatically close when it has finished the clean up, and it may take quite a while to finish if this is the first time it has been run. Cup of coffee time.
The next operation I run is called Malwarebytes’ Anti-malware. This is one of the free downloads so just Google Malwarebytes and it will give you the website to find the download. Once you have downloaded the program, start it and click on the update page. It is always a good idea to run the updates every time you use this program, and don’t just update it once. Keep running the update until you see the small pop up saying you have the latest version. Once you have the latest update you can click on the Scanner page and run the scan. Here you have two choices. Quick Scan and Full Scan. Unless you have more than one drive in your computer, the quick scan is the one to use. The full scan allows you to choose what drives to scan and takes a bit longer to run. At the end of this operation it will bring up a window with the scan log. This shows what it has examined and whether there are any adware, malware or threats found. Just close this window as it will log this for future reference. If you have any threats then it will take you through the procedure to remove them. A word of warning here. Any time you have a program tell you that it has found threats, there is a rare possibility that it has listed something that it thinks is dangerous but is actually harmless and useful. This is a risk we have to take if we want a clean computer. So if you have a program that won’t run properly after running any of these cleaning programs, then that is probably the reason for it. Just don’t come blaming me ‘cause I told you so.
There is another antimalware program I use, but I tend not to install it on computers as it can tend to slow other operations down. It is called Superantispyware and again it is a free download. The version I use is a portable version that I have installed on a flash drive. If I have a computer that has a serious problem such as a scare ware virus, then I will plug in the flash drive and run it from there. The other good thing about this portable program is it is running off a drive that is not infected and it will usually get rid of the infection with no problem. Again, there is a risk of it removing something harmless, but it can usually be fixed. I have had a scare ware infection that has stuck itself to the System32 files on the computer. When this happened several programs would not work because the cleaner ripped out a few system32 files with the infection. But again, it was easily fixed by Googling the problem on the internet.
The next procedure is the actual ant-virus program. I very rarely find anything wrong here, but it is always a good thing to run it on a regular basis. Again free downloads are available, and the ones I recommend are AVG antivirus and Avast antivirus. Another word of warning. These are perfectly good programs but do not use both on the same computer. They will fight each other and you will end up with a very frozen computer system. I know because I once did it and it took me hours to free it up. Do the same as you did with the anti-malware program and run the update first, followed with a quick scan. If it finds anything, then it will either kill it or place it in the quarantine section until it updates with a removal tool. The difference between an anti-malware program and an anti-virus program is that the anti-malware program usually only runs when you ask it to, where as the anti-virus program is running in the background all the time, scanning everything that comes in or goes out.
The next procedure is one that often gets forgotten. This is a registry cleaner, and the one I use is called RegscrubXP. This is also a free download and only takes a minute or two to run. Just open the program and click the button at the top that says ‘RegscrubXP find problems’. This will scan the registry of the computer and find any redundant registry files. Once all the boxes along the top of the page are filled in, it will give you the buttons along the bottom. Press ‘Select all problems’ and then the button ‘Fix selected problems’. Once the entire list has disappeared then you can click the exit button. Sometimes it will stop and tell you that a certain file cannot be removed. This is because the file is being used by another program. You can add this file to the exceptions folder and in the future the program will skip over this file.
The last operation is the defragmentation or defrag. There is one already on the computer and you can find it in the system tools folder where you found the clean disk program at the beginning. I use another program for this job that I have found to be quicker than the Windows version, and yes you’ve guessed it. It’s a free download. By now you should have realized that I’m a tightwad. The one I use is by Auslogics, so just Google Auslogics defrag and download from their website.
The reason for defragging a computer can be shown in this analogy. Imagine your computer’s hard drive is a library, but instead of books it stores files. Each time these files are used they are taken off the library shelves, used and then put back on the shelves. But the problem is that they are not put back on the shelf in the right place. They are just dumped on the nearest shelf and then a load more files are taken off the shelves and used. Eventually the librarian takes more and more time to find these files and so it slows the system down. Defragging is the procedure of picking up all the files and putting them back in the right place on the shelf.
All these procedures will take a longer time if you have not done them for a while. If you do it on a regular basis then it will take less time and your computer should run more efficiently.
If you wondered after reading where these adware come from, whether the free downloads that I have been telling you to use have them, then all I can tell you is that I have never had any problem with these programs. Also, the mere fact that you are going to run these programs should clean any adware out.
These are the procedures that I personally use and if you know of any reason why you should not use them, then so be it. You use them at your own risk.
Friday, September 3, 2010
Monday, April 5, 2010
Powerpoint Basics
Using Powerpoint is not just another Office skill to learn. It has the added element of you presenting the show to an audience. I will try to deal with both elements as we go through the article.

If you look at the screen print in Figure 1, you will see there are three main parts to the page. The section running across the top of the page is the toolbar section, but we will look closer at that in a little while. The section running down the left hand side is called the slide selector. This is where you will see a small icon of all the slides you have produced. We only have one slide showing at the moment because we have not begun to produce the presentation yet. When we have several slides there, clicking on one of the icons will bring it up in the main section.
The main section of the screen is showing the current slide. When you open up Powerpoint it will start with this type of slide as a default. You can see that it has two boxes set on it. These are the title and subtitle boxes. As the boxes state, click in the top box to type the title and then click in the lower box to type the subtitle.

In Figure 2 above, you can see the left hand side of the toolbar section. The main buttons on here are the Home, Insert, Design, Animations, Slide Show, Review and View tabs. The Home tab is the general work tab. This is where you will find all the text set up buttons such as you would in a Word document. There is also the New Slide button. This is in two parts. Pressing the upper part will insert a new default slide directly into the slide selector and it will also appear in the main section. This default slide is for any slide after the title page and includes a title box and a larger box to insert your main information.
Pressing the lower part of the New Slide button will produce a drop down box showing a selection of different slide layouts. You can click on any of these to insert it into the slide selector.
There are many more buttons residing in the Home tab, but there is not enough time to list them here, my advice with all Office applications is to play with them and you will soon see how things work.

In Figure 3, you can see six icons in the center of the large text box. These are insert shortcuts. Clicking on any of these icons will help you insert the particular type of media you have chosen. If you just want to add text, then just click in the box as normal and start typing.
You will also notice that the second small slide in the slide selector section is highlighted. This shows you at a glance which slide you are working on. If you click on any of the other slides here, it will take you to that slide. In this case we only have one other and that is the title slide.

In Figure 4 the Insert tab has been selected and you can see the many types of objects and media you can insert into the slides. You can insert everything from simple text to photo albums, soundtracks and movies. Once again playing with the application will teach you much more than reading a blog.

Figure 5 shows the Design toolbar. This is where you can start to add a little color and interest. If you have already made a few slides, then hovering your cursor over the design panes at the top will change your slides and allow you to see what each design would look like. When you have chosen one you like, just click it and it will insert the design to all your slides. One word of warning. Some of the designs have different placement of the titles and text boxes. You may have to go through the slides and adjust the text and object to work with the new design.

In Figure 6 we see the Animation tab. This is where you can let your imagination start to run, but try and keep control as too much special effects can distract your audience’s attention away from your presentation subject and on to all the gadgets and gizmos you have going on behind you.
The main part of the toolbar is similar to the design tab where you had several option panes that you could choose from. In this case it is slide transitions. Putting your cursor over each pane will show you how the slide change will act.

Figure 7 shows the slide show tab open. If you have any animation inserted in your presentation, then this is where you can check to make sure it works. You have the option to run the presentation from the beginning or from any slide that you select. It will show it in full screen mode, just as it would appear at your presentation. It is a good idea to check and recheck your slides as you build your presentation. It can be very tedious to correct all your mistakes all at once.
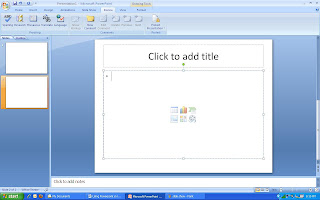
Figure 8 shows the review toolbar. This is another tab to use frequently as it is where you check things like spelling, research sources and editing the notes, which we will talk about later.

Figure 9 shows the View tab. This is a useful tab when you want to re-organize your presentation. You can see in this one I have chosen the slide sorter tab. This will allow you to see your slides all on one screen, where you can drag and drop to rearrange them in a different order.
You also have the different master tabs. These allow you to separately organize slides, notes and handouts. When these tabs are used, they will replace the normal toolbar section with their own master toolbar. To return to the normal toolbar, just click the close master button on the right hand side.
We have mentioned Notes a couple of times so now is the time to explain what they are used for. Basically, they are your script. If you look below the main slide section on the earlier diagrams, you will see a small section with the words ‘Click to add notes’. This is where you will type your notes to guide your presentation. Each slide will have its own notes attached to it. This helps to prevent you from either missing to mention something pertinent to the particular slide or actually saying too much.
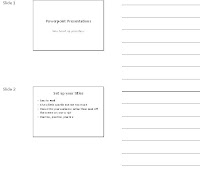
When you have finalized your presentation, you can print out your ‘script’ with prints of your slide and the notes underneath them as shown in Figure 10 below.

You may want your audience to take something away with them, to remind them of all the information you have presented. You can do this in the form of handouts. These are printouts of the slides, with a space beside each one for the viewer to take their own notes as you progress through the presentation. Figure 11 shows a typical handout where the audience can take their own notes and Figure 12 includes the notes you yourself included.
The way to prepare these handouts is very simple. Click on the Office button in the top left corner of the screen and it will show the drop down list of options. Select Publish and then select ‘Create handouts in Microsoft Word’. This will then open an options box where you can select the type of handout you want and Word will open and produce the handout automatically.

The many options you have to personalize your presentation are too numerous to mention here. But I hope I have given you the basic tools to start your first presentation. The main things to remember are:
1. Keep your slides smart but simple
2. Do not use too many special effects
3. Try to refrain from having too much for the audience to read on each slide.
4. Practice the presentation until it is second nature.
5. Play with the application. Experiment with different tabs. That way you will learn more of what you can do with Powerpoint.

Figure 1
If you look at the screen print in Figure 1, you will see there are three main parts to the page. The section running across the top of the page is the toolbar section, but we will look closer at that in a little while. The section running down the left hand side is called the slide selector. This is where you will see a small icon of all the slides you have produced. We only have one slide showing at the moment because we have not begun to produce the presentation yet. When we have several slides there, clicking on one of the icons will bring it up in the main section.
The main section of the screen is showing the current slide. When you open up Powerpoint it will start with this type of slide as a default. You can see that it has two boxes set on it. These are the title and subtitle boxes. As the boxes state, click in the top box to type the title and then click in the lower box to type the subtitle.

Figure 2
In Figure 2 above, you can see the left hand side of the toolbar section. The main buttons on here are the Home, Insert, Design, Animations, Slide Show, Review and View tabs. The Home tab is the general work tab. This is where you will find all the text set up buttons such as you would in a Word document. There is also the New Slide button. This is in two parts. Pressing the upper part will insert a new default slide directly into the slide selector and it will also appear in the main section. This default slide is for any slide after the title page and includes a title box and a larger box to insert your main information.
Pressing the lower part of the New Slide button will produce a drop down box showing a selection of different slide layouts. You can click on any of these to insert it into the slide selector.
There are many more buttons residing in the Home tab, but there is not enough time to list them here, my advice with all Office applications is to play with them and you will soon see how things work.

Figure 3
In Figure 3, you can see six icons in the center of the large text box. These are insert shortcuts. Clicking on any of these icons will help you insert the particular type of media you have chosen. If you just want to add text, then just click in the box as normal and start typing.
You will also notice that the second small slide in the slide selector section is highlighted. This shows you at a glance which slide you are working on. If you click on any of the other slides here, it will take you to that slide. In this case we only have one other and that is the title slide.

Figure 4
In Figure 4 the Insert tab has been selected and you can see the many types of objects and media you can insert into the slides. You can insert everything from simple text to photo albums, soundtracks and movies. Once again playing with the application will teach you much more than reading a blog.

Figure 5
Figure 5 shows the Design toolbar. This is where you can start to add a little color and interest. If you have already made a few slides, then hovering your cursor over the design panes at the top will change your slides and allow you to see what each design would look like. When you have chosen one you like, just click it and it will insert the design to all your slides. One word of warning. Some of the designs have different placement of the titles and text boxes. You may have to go through the slides and adjust the text and object to work with the new design.

Figure 6
In Figure 6 we see the Animation tab. This is where you can let your imagination start to run, but try and keep control as too much special effects can distract your audience’s attention away from your presentation subject and on to all the gadgets and gizmos you have going on behind you.
The main part of the toolbar is similar to the design tab where you had several option panes that you could choose from. In this case it is slide transitions. Putting your cursor over each pane will show you how the slide change will act.

Figure 7
Figure 7 shows the slide show tab open. If you have any animation inserted in your presentation, then this is where you can check to make sure it works. You have the option to run the presentation from the beginning or from any slide that you select. It will show it in full screen mode, just as it would appear at your presentation. It is a good idea to check and recheck your slides as you build your presentation. It can be very tedious to correct all your mistakes all at once.

Figure 8
Figure 8 shows the review toolbar. This is another tab to use frequently as it is where you check things like spelling, research sources and editing the notes, which we will talk about later.

Figure 9
Figure 9 shows the View tab. This is a useful tab when you want to re-organize your presentation. You can see in this one I have chosen the slide sorter tab. This will allow you to see your slides all on one screen, where you can drag and drop to rearrange them in a different order.
You also have the different master tabs. These allow you to separately organize slides, notes and handouts. When these tabs are used, they will replace the normal toolbar section with their own master toolbar. To return to the normal toolbar, just click the close master button on the right hand side.
We have mentioned Notes a couple of times so now is the time to explain what they are used for. Basically, they are your script. If you look below the main slide section on the earlier diagrams, you will see a small section with the words ‘Click to add notes’. This is where you will type your notes to guide your presentation. Each slide will have its own notes attached to it. This helps to prevent you from either missing to mention something pertinent to the particular slide or actually saying too much.
When you have finalized your presentation, you can print out your ‘script’ with prints of your slide and the notes underneath them as shown in Figure 10 below.

Figure 10
You may want your audience to take something away with them, to remind them of all the information you have presented. You can do this in the form of handouts. These are printouts of the slides, with a space beside each one for the viewer to take their own notes as you progress through the presentation. Figure 11 shows a typical handout where the audience can take their own notes and Figure 12 includes the notes you yourself included.
The way to prepare these handouts is very simple. Click on the Office button in the top left corner of the screen and it will show the drop down list of options. Select Publish and then select ‘Create handouts in Microsoft Word’. This will then open an options box where you can select the type of handout you want and Word will open and produce the handout automatically.

Figure 11

Figure 12
The many options you have to personalize your presentation are too numerous to mention here. But I hope I have given you the basic tools to start your first presentation. The main things to remember are:
1. Keep your slides smart but simple
2. Do not use too many special effects
3. Try to refrain from having too much for the audience to read on each slide.
4. Practice the presentation until it is second nature.
5. Play with the application. Experiment with different tabs. That way you will learn more of what you can do with Powerpoint.
Sunday, March 21, 2010
Online Research
Many classroom projects require you to research material, whether this is from a book from the library, talking face to face with experts, or using an online search engine.
This article will deal with finding information on the web, and this is an easy and fast way to gather it.
There are a couple of points to remember before you start.
1. Not all information found on the web is fact. A lot of information is put there by people who think they know the answer and not by true experts. A good example of this are sites like Wikianswers or Answers.com. These are community websites where people post a question and someone else tries to answer it for them based on their own experience. Not all the answers are correct. If you find a point of information, the best thing to do is first check the credentials of the author and then see if you can find the same information from another source to back it up.
2. Everything worth collecting on the web actually belongs to someone so you have a moral and maybe even a legal obligation to acknowledge them.
Okay, you have been tasked with finding information for a certain project. The first thing to do is start a research base, somewhere you can collect this information and save it for later use. The easiest way to do this is to open a Word document. This will be where you copy and paste all your findings. Never try to print a webpage straight from the site. You may find that the webpage is much bigger than you realise.
Now open your internet browser and head to your favorite search engine. Mine is the good old favorite Google. It has less clutter than most and has been going a lot longer too. A lot of the others tend to be more commercially based so if you type in your keyword, eg 'apples', you will probably get adverts for businesses that sell apples.
Now we have both the Word document open and the web browser on the search engine page, it's time to type in the keywords. Here is where a lot of students trip up. Remember that the search engine will look for every word you type, so if you typed in 'apple pictures' in the Google images section you would possibly get all sorts of pictures, graphics and diagrams with the slightest link to the word apples. If you just typed in the word 'apples' then you would get pictures of apples. It makes it quicker to find what you are looking for if you keep the keywords as simple as possible.
Now let's say we want to find how to to bake an apple pie. Go to the web section of Google and type in either 'how to bake an apple pie' or 'apple pie recipe'. This will bring up lots of links to recipe and how to pages. Your next step is to scan down the list and pick one. This page will probably have sponsors, so you will get adverts in the borders. Unfortunately this is something we have to deal with these days, and a lot of websites are funded by these sponsors so if they weren't there, neither would the website.
We see the instructions and apple pie recipe on the page, so we want to keep that, but not all the adverts. First left click and drag the cursor over the text we want, to highlight it. With your cursor still over the hightlighted section, right click and copy the text.
We now bring up the Word document. We can do this by either clicking on the tab in the bottom bar, or pressing Alt, Tab. With the Word document up we place our cursor on the page, right click and paste our recipe onto the page. There may be unwanted objects that came with it from the website like table borders. You can usually clean these out by clicking on the table border to highlight it and then pressing delete. Also don't forget you have to acknowledge the source so either type it under the text or switch back to the website and copy and paste the information.
This is the basic operation for all findings, whether it be text or images. You should soon have several pages of research material to work from. What you do with it now is up to you. You could just post or print that as your project, as long as everything is ackowledged, but your teacher would probably send it back to you as not finished. You have to show that you understand the information you have found and have actually read it. To do that, you should write your own paper using the information, but in your own words. At the bottom of your paper there should be a bibliography, which is a list of all your sources.
A parting note. A lot of good information can be found on Wikipedia. This is a great site, with lots of links to extra information. It also has the added feature of stating whether the information is confirmed or not. A wiki is a web page of information on a certain subject built by several contributors. Each time a new peice of information is added, it will show as unconfirmed until other contibutors have confirmed it.
Wikipedia is just that, an encyclopedia of wikis, and is one of the most sucessful and useful websites around.
If you have any questions or comments, you can either leave them in the comments section or see me at school and I will promise to deal with them
Subscribe to:
Comments (Atom)